Passive DNS - a tutorial to setup your own Passive DNS using D4 Project

Table of Contents
- Motivation
- Architecture Overview
- Preparation
- Set up
- Appendix : Installing a server
- Appendix : Installing a sensor
Passive DNS or pDNS is a service which records domain name system server (DNS) answers to DNS client requests. In order to see the evolution of records over time, a history is recorded. Various sources can be used to build a large sensor network. The DNS historical data is indexed which makes it searchable for incident handlers, network/security analysts or researchers. At D4 Project, we provide a set of open source components to build sensor networks. This tutorial shows how to the setup your own Passive DNS sensor network and database using only open source software.
Motivation
- CIRCL (and other CSIRTs) have their own Passive DNS collection mechanisms (eg. CIRCL’s pDNS)
- Current collection models are affected by DoH (DNS over HTTPS) and centralised DNS services
- DNS answers collection is a tedious process
- Sharing Passive DNS streams between organisations is challenging due to privacy rules
The D4 strategy is the followin:
- Improve Passive DNS collection diversity by being closer to the source and limit impact of DoH (e.g. at the OS resolver level)
- Increase diversity and (mixing models) before sharing/storing Passive DNS records
- Simplify process and tools to install for Passive DNS collection by relying on D4 sensors instead of custom mechanisms
- Provide a distributed infrastructure for mixing streams and filtering out the sharing to the validated partners
Architecture Overview
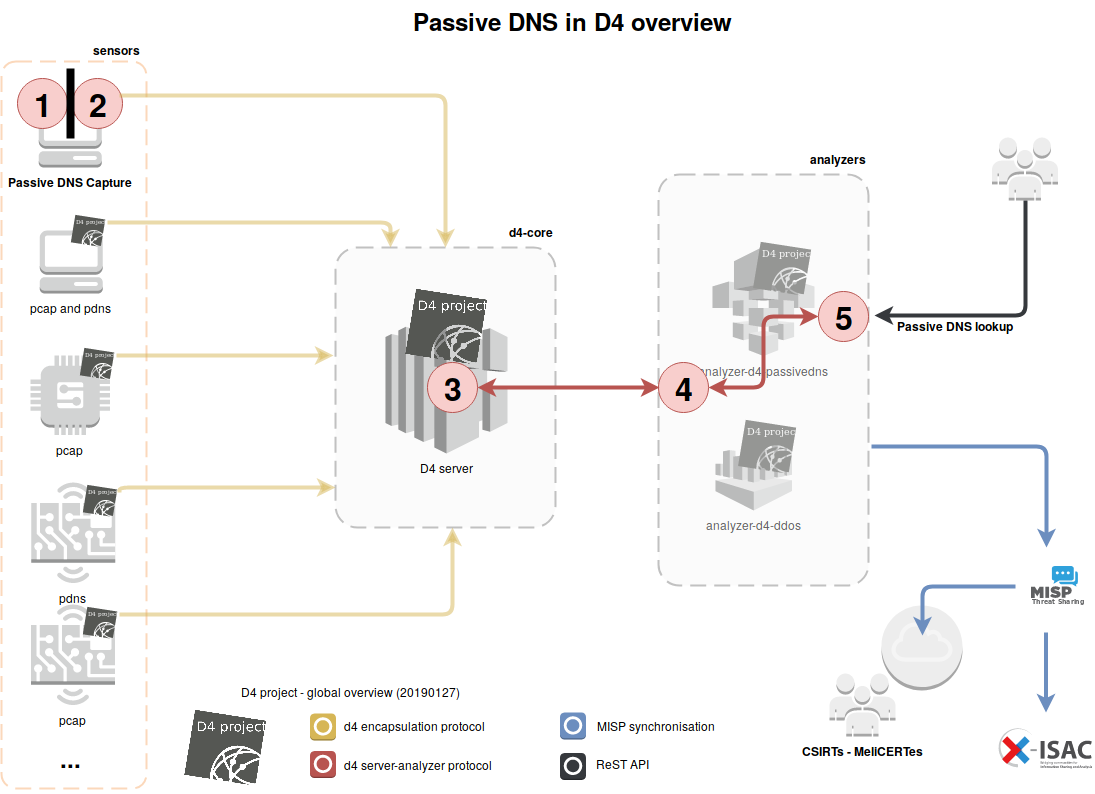
Before diving into the HOWTO, let’s review how DNS data will flow in D4 and what are the different actors. The following diagram reads from left to right, with sensors on the left, and end-users of our pDNS webservice on the right. Software components are numbered in red circles.

The following table sums up the D4 architecture and how its components interact:
| # | description |
|---|---|
| 1 | PassiveDNS: captures DNS requests on an interface and pipes its standard output to d4-goclient (2) |
| 2 | d4-goclient: encapsulates data from stdin (1) and sends it to the d4 server defined in the config file |
| 3 | D4-core server: decapsulates d4 packets and pushes the content –PassiveDNS "\n"-separated records– to a list of D4 analyzer redis queue |
| 4 | analyzer-d4-passivedns/bin/pdns-ingestion.py: pops a specific D4 analyzer redis queue and pushes into a redis DB that is the REST API's backend |
| 5 | analyzer-d4-passivedns/bin/pdns-cof-server.py: serves the REST API |
Preparation
We distribute a Virtual Machine (VM) for this tutorial (tested under Virtual Box 6.0–please don’t use this in production): Please download from here
171c0b5f3fd6314a712eb6a24cc7b04dc5373522d55937a826d1af679037699a D4_DEMO.ova
To install your own D4-PassiveDNS instance in production follow the Appendix at the end of this page.
This D4 set-up requires several ports on the VM being opened. Here is the current setup after importing the .ova file into Virtual Box (VB):
| Service | Host IP | Host port | Guest port |
|---|---|---|---|
| D4 server - Admin Web Interface | 127.0.0.1 | 7000 | 7000 |
| D4 server - ssh | 127.0.0.1 | 2222 | 22 |
| D4 server - tls d4 | 127.0.0.1 | 4443 | 4443 |
| D4 server - Passive DNS lookup | 127.0.0.1 | 8400 | 8400 |
This VM already contains all the needed D4 components, that we will now
configure to set up a full D4-PassiveDNS chain.
For testing purpose (generate DNS traffic inside the guest VM), we will use SSH as a SOCKS5 proxy. Fire up the VM and use a terminal to reach it from the host:
ssh -D 1337 -E /dev/null d4@127.0.0.1 -p 2222 #d4's account password is 'Password1234'.
To use this proxy with any web browser, for instance chromium:
chromium --proxy-server="socks5://127.0.0.1:1337" --proxy-bypass-list="<-loopback>"
You can use can use this terminal to interact with the VM, the SOCKS proxy will stay accessible as long as this SSH connection remains open.
Now that we have a ssh connection opened on the VM, the first step we have to perform is to retrieve the D4 admin password generated during the installation:
cat d4-core/server/DEFAULT_PASSWORD
This will output the credentials needed to connect for the first time on D4 web interface (use a non-proxied web browser).
Set up
Passive DNS Collection
Two components are used for the collection: passivedns and d4-goclient. Both are installed system-wide, for demonstration purpose launch passivedns using the following command:
sudo passivedns -i eth0 -l /dev/stdout
Use your proxied web-browser (set up as explained above) to see the passivedns records printing on screen in the following form:
1558960214.117262||10.0.2.15||10.0.2.3||IN||hubt.pornhub.com.||CNAME||hubtraffic.com.||3600||1
The output of this command will be piped into d4-goclient, but we need to specify the correct parameters to reach the server.
Fortunately, the configuration is already done in ~/go/src/github.com/D4-project/d4-goclient/conf.vbox/
Each of these parameter is written in a file with the same name. These are detailed in the following table:
| parameter | description | value |
|---|---|---|
| destination | address and port of the receiving D4 server | 127.0.0.1:4443 |
| source | where to look for input data | stdin |
| snaplen | D4 packet size | 4096 |
| type | type of D4 packets sent, this is used by d4-server to know how to handle the data received | 8 |
| uuid | sensor's unique identifier | automatically provisioned |
| key | a Pre-Shared Key used to authenticate the sensor to the server | "private key to change" |
| version | D4 protocol version | 1 |
We can now point this configuration to the d4-goclient by using the -c flag, and
combine both commands:
cd ~/go/src/github.com/D4-project/d4-goclient
sudo passivedns -i eth0 -l /dev/stdout | d4-goclient -c conf.vbox
Protip: change the destination to stdout to observe D4 protocol at work!
Protip: for more convenience, you can prefer launching this task in a screen:
cd ~/go/src/github.com/D4-project/d4-goclient
screen -dmS "pdns-collection"
screen -S "pdns-collection" -X screen -t "collection" bash -c "sudo passivedns -i eth0 -l /dev/stdout | d4-goclient -c conf.vbox; read x;"
If you are only interested into how to set up a D4 sensor congratulations! you are done, your sensor is streaming its pDNS capture to the specified D4 server (contact us at info@circl.lu if you want to push to ours!).
D4-core server
D4-core server is in charge of managing sensors and analyzers. Point a
non-proxied web browser to the following address: http://127.0.0.1:7000 to reach
it. In the following view, D4-server lists numbers of packets received by D4
packets type and sensor UUID:

On the status page, one can list all connected sensors. If your passivedns collection works, you should have one sensor appearing as connected:

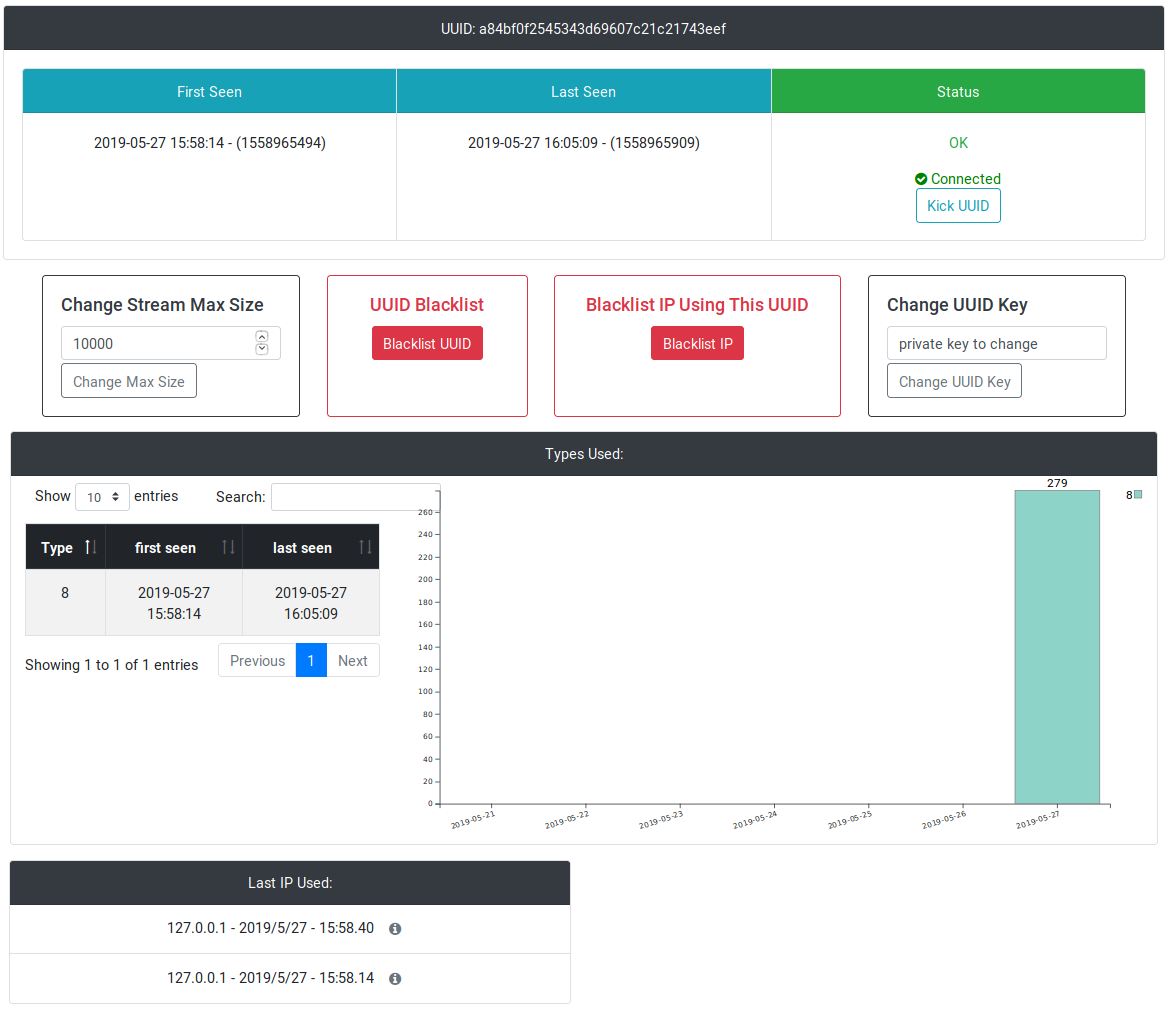
Clicking on the UUID leads to the detailed status page of a sensor, along with some statistics on various available server commands:

What we are interested in right now is located under the server management page.
What we need to do here is to create a Redis queue that will be the link between
the d4-server worker (remember the #3 up there on the first diagram) that
unpacks D4 type 8 packets, and analyzer-d4-passivedns (4). In order to create
this queue, scroll down the page and locate the Add New Analyzer Queue box:

Input the following:
| field | description | value |
|---|---|---|
| #1 | D4 type: DNS capture type is 8 | 8 |
| #2 | uuid: click on the left-end side button to generate one | |
| #3 | Description of what this analyzer do | pdns web service |
Note that you can create duplicate Redis queues and that analyzers will fetch
from. Enter an informative description in the description field is a good idea
for not losing track of what is going on on your server.
analyzer-d4-passivedns
Now that the Redis queue is ready to be used by our analyzer, we need to set it up
to use it. Analyzer-d4-passivedns is located in d4’s home directory. cd to ~/analyzer-d4-passivedns/etc to modify analyzer.conf (vim and nano are installed):
[global]
my-uuid = uuidthatappearinthed4interface
d4-server = 127.0.0.1:6380
# INFO|DEBUG
logging-level = INFO
Copy and paste the UUID of the Redis queue you just created for your analyzer.

If you browse a website using your proxied web browser, you should see items
populating this Redis queue. This counter will soon decrease to 0 as we will
launch the analyzer that will consume these items.
Final steps
Now that everything is in place, we need to launch the analyzer.
Execute the launch-server.sh script located under ~/analyzer-d4-passivedns.
This will create a screen session called pdns with the passivedns executables in tabs.
cd ~/analyzer-d4-passivedns
./launch_server.py
Protip: You can reattach screen and navigate tabs:
screen -r pdns # reatach detached screen
# Use Ctrl+a " to switch tabs
# Use Ctrl+a d to detach the current screen
By pointing your webbrowser to http://127.0.0.1:7000/server_management you can
observe that the analyzer queue is now emptied as soon as new entries enter the
queue:

All pDNS records corresponding to the domains that have been resolved by the Guest VM are now accessible through the pDNS REST API (see IETF draft on Passive DNS Common Output Format for details):

Appendix : Installing a server
For those people who wish to host their own server on a dedicated VM or physical machine we go through the server installation process (as it is detailed in d4-core project repository)
The server requires having Python 3.6 on a GNU/Linux distribution (however, we only tested on Debian and Ubuntu so far). To install the server, follow these steps:
git clone https://github.com/D4-project/d4-core.git
cd d4-core/server
./install_server.sh
cd gen_cert
./gen_root.sh
./gen_cert.sh
cd ..
./LAUNCH.sh -l
The last step launches the required server components in screen that one can list/reattach using:
screen -ls #list available screens
screen -r Flask_D4 #reattach Flask_D4 screen, output of the web server
screen -r Workers_D4 #reattach Workers', all worker debugging output
screen -r Server_D4 #reattach Server's, d4 decapsulation output errors
screen -r Redis_D4 #reattach Redis's, db
Protip: most of our screen sessions have tabs (navigate using ctrl+a “)
All logs are located in ./logs
To kill the server use:
./LAUNCH.sh -k
Conclusion
This tutorial gives the basis to setup a simple and complete sensor network relying on D4 Project software along with existing open source tools. Our objective is to open the gate to new ideas of collection, analysis and sharing. Don’t hesitate to reach out to us if you have any ideas, remarks or feedback.
Appendix: Installing a sensor
There are two clients available for creating a D4 sensor:
- the one included in d4-core, written in C
- d4-goclient that you already used during this tutorial.
C version
This client has already been successfully tested under linux/amd64 and openbsd/amd64 systems to stream data from Unix standard input. The main advantage of this implementation is that it is lighweight (~37KB), and only does D4 encapsulation (so it is easier to audit).
To install the C client, do the following:
git clone https://github.com/D4-project/d4-core
cd client/
git submodule init
git submodule update
make d4
The config files work in the same manner as the Go client. The main different is that the C client does not provide TLS connectivity by itself.
Therefore in order to ship D4 encapsulated data to a remote server, one needs to
pipe the output of the client into socat or netcat:
# conf/destination is set to stdout
sudo passivedns -i eth0 -l /dev/stdout | ./d4 -c ./conf | socat - OPENSSL-CONNECT:$D4-SERVER-IP-ADDRESS:$PORT,verify=0
d4-goclient
The Golang client provides more features out of the box (eg. TLS, retries on disconnect, etc.). The main advantage of this client is its portability across architectures and operating systems.
To install the Go client, do the following:
go get github.com/satori/go.uuid
go get github.com/D4-project/d4-goclient
make amd64l # for amd64
To compile easily for other architectures and operating systems, one can rely on gox:
go get github.com/mitchellh/gox
gox
